Video Tutorial – Making Wrapped Loops and Eyepins
At some point in beaded jewelry, you’ll need to use wrapped loops and eyepins. And while you can buy the eyepins easy enough, you have to do the wrapped loops yourself.
If you already know how to do them, it’s no big deal. However, if you’re not sure or if your loops seem crooked, then read on and watch the free video on making wrapped loops and eyepins.
Video Tutorial and Notes on the Earrings
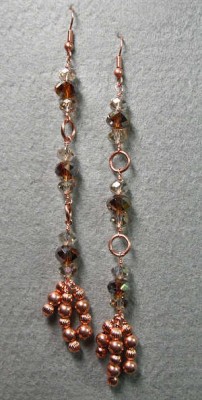
In the beginning of the video tutorial I show a pair of earrings for an example of what you can do with wrapped loops. I didn’t show how to make the earrings as a whole (just mentioned what I used when I did a demo on making double-wrapped loops). But, I think I will do a quickie tutorial on making the same style earrings in the next week or so. Meanwhile, if you want to make these earrings, the supplies needed are:
- 2 earring findings, copper
- 6 glass rondells, 6mm, amber-colored
- 12 glass rondells, 4mm light topaz AB
- 4 jumprings, copper
- 5 copper beads, 5mm
- 14 copper beads, textured, 4mm
- 6 headpins, copper
- Copper wire, 24 gauge
The video is only around 16 minutes long, so it won’t take up a lot of your time. However, I hope you feel it is time well-spent!
And if you enjoyed the video, you are (of course) free to like me on Facebook. 🙂
All that being said, here’s the video tutorial. Enjoy!
Bead Embroidery Bracelet — “Harlequin’s Romance”
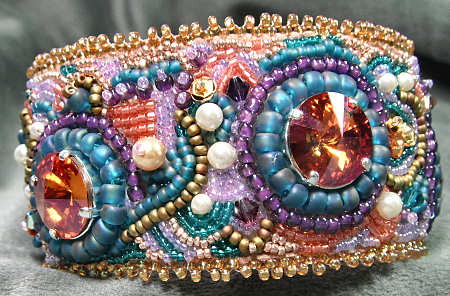
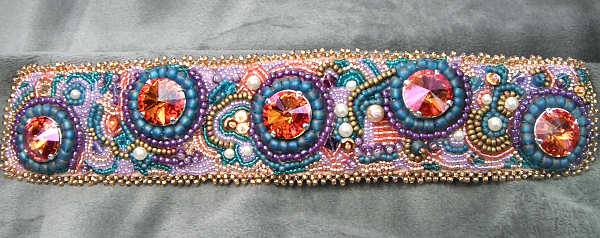
Here’s my first “over the top” bead embroidery bracelet/cuff. While I don’t normally make jewelry that I can’t wear (i.e. really fancy items), after my class with Sherry Serafini I just had to try.
(BTW, if you ever get a chance to take a class with Sherry, do it — she’s a great teacher and very, very nice.)
Bracelet Ingredients
So what went into this bracelet/cuff? It started out with five rivolis, in a color called “Summer Blush” (which is an aftermarket color). I got them already in a sew-on setting, so I didn’t have to go through any gyrations to get them on the bracelet.
I knew I needed some seed beads from sizes 6 through 15, but what colors? I must admit I am color-challenged when it comes to hues I don’t often use (like the orange/peach of the rivolis). Out came the color wheel and I soon had a pallet to work with.
As I worked, other ideas for embellishment popped in my mind. Swarovski pearls and bicones were kind of a given, but then I thought about sequins — now that is something that I never use, so I went digging and found some.
I used the new embroidery backing I had found, plus a heavier Ultrasuede than I normally use. And I almost made a huge goof when it came to the Ultrasuede. I cut out my piece and was getting ready to glue it on to the embroidery foundation when I decided to flip it over and see if I liked the other side better (to face out). Good thing I did, because it was stamped with a lot number!
Lessons Learned With “Harlequin’s Romance”
I learned a lot when making this bracelet/cuff (I’m not sure where the division lies, but this is almost 1.75 inches wide). Some of the lessons include:
Be careful about when you decide to cut the ends! I cut mine too soon, and so the cuff (I’ve decided it’s a cuff now) ended up a wee bit short. Easy fix, seeing as I had a tube clasp readily available, but I was really hoping for a hook and eye.
When you run out of a certain color of beads, don’t panic! Pick another color and carry on.
When using heavier Ultrasuede, make sure to cut it close to the foundation. I tend to cut my Ultrasuede a little larger than the embroidery foundation, and with a lighter-weight Ultrasuede, this works well — it pulls down over the foundation and makes it look nice. With the heavier Ultrasuede, that didn’t work as well, so I had to come up with an alternate plan once I had my edging in place.
The best laid plans go astray when doing freeform bead embroidery. I had to make decisions along the way when my piece was moving in a design direction I hadn’t planned. I just decided to go with it, rather than sweating it. (And with freeform, who’s to know anyway?)
Will There be a Tutorial?
I don’t think I will do a tutorial on “Harlequin’s Romance”, but working it gave me some great ideas for a different bracelet/cuff. I have a plan in the works for a piece of jewelry that can be tailored or full of bling, depending on a few key components. This one will be narrower (maybe 1 inch wide), but with an option for wider (or even narrower).
So that’s the story of this project! But stay tuned, as there is more to come. 🙂
Bead Embroidery Bracelets Tutorial 1 – Silver Starburst and Perchance to Dream

Bead Embroidery Bracelets — Silver Starburst and Perchance to Dream
I had so much fun with the bead embroidery components tutorial that I went right on and decided to make some bracelets! Yep, each of these bead embroidery bracelets — “Silver Starburst” and “Perchance to Dream” are now in e-book form!
What You Will Learn
In the 25 pages of the Bead Embroidery Bracelets 1 tutorial, you’ll learn lots, including the following.
- How to design your bracelet so that it fits you perfectly.
- The kinds of supplies you’ll need for bead embroidery, and how they fit in to the projects as a whole. And why some supplies are better than others.
- Bead embroidery stitches, along with some tips for making some of them easier and faster.
- Two bracelets — “Silver Starburst” and “Perchance to Dream”. Naturally, you’ll get a full supply list, including the seed bead color numbers.
- Picot fringing, which softens the more tailored look of these bracelets.
There are lots and lots of photos for the steps — most are close-ups so you can see exactly where you need to put your needle!
Here’s a quick look at the bracelets in video format…then continue on down below!
How to Get the Tutorial
Your tutorial is delivered as an ebook, so it’s an immediate download. This means you can satisfy your “need to bead†at any time of day or night!
(Keep in mind that while you’re not getting a paperback copy in the mail, it also means that you don’t have to wait for the mailman — yay!) Also, because of the nature of this tutorial, there are no refunds. But I’ve tried my best to over-deliver for you!
The Bead Embroidery Bracelets tutorial is just $5, and you’ll get detailed instructions (and photos!) for making the bracelets “Silver Starburst” and “Perchance to Dream”. And of course, you will get a full supply list.
So click the “Add to Cart†button above and you’re on your way to making your bead embroidery bracelets. It’s secure and you can safely pay with any major credit card. You’ll receive the download link in an email right after you place your order.


