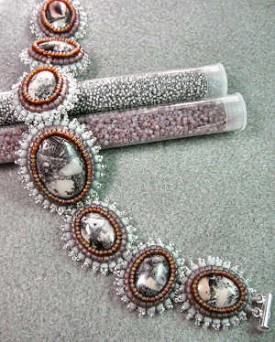
About Bead Embroidery Backing…
I’ve had a few questions on bead embroidery backing, so I thought I would share a little overview with you – and also a video about it as well. 🙂
What is Bead Embroidery Backing
You’ve seen some of my bead embroidery, and you’ve probably also seen more in magazines and videos. Maybe you’ve thought about trying it, but you weren’t sure what you should use when actually doing the embroidery.
Quite simply, the beading foundation (backing)is what you actually embroider your beads upon. You sew upon it, stitching the beads in place. That’s all it really is, but what do you use?
What Can You Use?
Long ago and far away, fabric and/or interfacing was the backing that was available. The problem with fabric is that it mostly frayed — a real pain if you were making a piece of jewelry.
Felt was a thought, but it “wilted” pretty fast, and little tufts of felt would get caught in the embroidery — and that was a real pain to pick out if you had a large piece!
Interfacing was decent enough if you got just the right thickness. However, if you fused two pieces together, it made it kind of tough to get your needle through. Leather was the same way — you needed a thimble to get the needle through at times.
But what about Ultrasuede? It doesn’t fray or pill, and it’s much softer than leather or fused interfacing (not to mention easier to get your needle through). I know there are a lot of people who won’t use anything else. However, it it floppy, and many pieces need some sort of additional backing.
These days, the beading foundation of choice for most people is something called Lacy’s Stiff Stuff. You can find it in beading stores and online. It comes in sheets of 8.5 x 11 inches, and I’ve also seen it in 5 x 9 inches. It only comes in white, but you can color on it with permanent markers if you want, and it also accepts dye well.
I have recently found something called Nicole’s Bead Backing, which I got from Etsy. I was lucky enough to attend a class with the true bead embroidery diva, Sherry Serafini, and one of the students in the class had some of the new backing. The plus factor is that it’s a lot less expensive than the Lacy’s, and it comes in colors! The only minus I can really see is that it’s too new to have a good idea of how it stands up over time — but I am willing to give this new bead embroidery backing a shot!
So, take a peek at the video below and see for yourself what bead embroidery foundation backing is like. Then, make your own choice as to what to use on your next bead embroidery project! (And if you’ve found this video helpful, please give it a “like”).  🙂
Hope you’ve enjoyed this video, and that it was helpful!
Intro to Bead Embroidery Components Tutorial
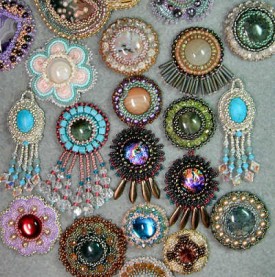 Yes, it’s finally here — my Intro to Bead Embroidery Components tutorial. It’s been a long time in coming, and kept growing in size when I added more and more topics and projects. It ended up with 60 pages and loads and loads of photos.
And of course, plenty of components and projects to keep you busy.
One of my favorites ended up being the dagger fringe earrings — made with dichroic cabochons, it turned up being delicious. :) It’s one of the components that kind of called out to me (I could hear the cabs pleading to be made into something pretty).
Why Components?
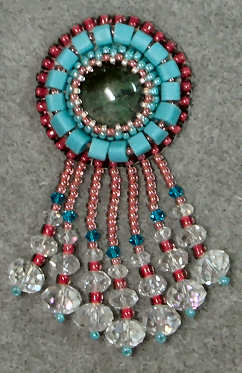 I love bead embroidery, and the drop-dead gorgeous projects I see in books and magazines are definitely eye candy! But collars and large cuffs aren’t what I wear for jewelry. And while I do enjoy bling, I also know that I would never be able to finish one of the broad collars — way too time-consuming for me.
Components, on the other hand, are as close to instant gratification as you can get! Not to mention that they can be dressed up or down to suit your fancy.
You can use them singly or connected together to make a necklace or bracelet. Maybe a pair for a set of earrings?
What about mixing and matching components? As you can tell, there are loads of things you can do.
And since each component works up pretty fast, you can start one after lunch and wear it that night.
(Oh by the way — it’s really fun, too!) 🙂
 What You Will Learn
In the 60 pages of the Intro to Bead Embroidery Components tutorial, you’ll learn lots, including the following.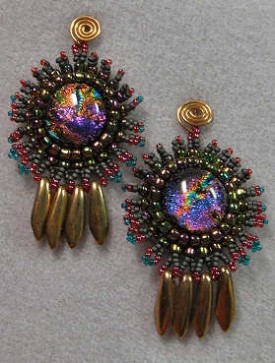
- The supplies you’ll need for bead embroidery, and how they fit in to the projects as a whole. And why some supplies are better than others.
- Bead embroidery stitches, along with some tips for making some of them easier and faster.
- Five different component styles with full instructions, that you can mix and match; and how using different beads can change the look.
- Fringe 101:Â Different kinds of fringework you can use with the bead embroidery components, one of which is the dichroic dagger fringe earrings.
- Two projects that show you how to use some components together.
And naturally…even more!
If you’ve been beading for a little while, you’ve most likely heard the word “components”. But how exactly does that apply to bead embroidery?
If you’re not quite sure what components can do for you, here’s a short video on some of what’s covered.
Here’s another idea of how to use components, in the bead embroidery bracelets tutorial.
How to Get the Tutorial
Your tutorial is delivered as an ebook, so it’s an immediate download. This means you can satisfy your “need to bead†at any time of day or night!
(Keep in mind that while you’re not getting a paperback copy in the mail, it also means that you don’t have to wait for the mailman — yay!) Also, because of the nature of this tutorial, there are no refunds. But I’ve tried my best to over-deliver for you!
The Intro to Bead Embroidery Components tutorial is just $10, and you’ll get instructions for making not only the components, but also a necklace and a pendant (or two). You’ll get all kinds of compliments, and you’ll be able to proudly say, “Yes, I made this myself!â€
So click the “Add to Cart†button above and you’re on your way to making your very own bead embroidery components and jewelry. It’s secure and you can safely pay with any major credit card. You’ll receive the download link in an email lickety-split after you place your order.
Thanks so much, and enjoy making your very own bead embroidery components!
Quick Dangle Earrings Video Tutorial
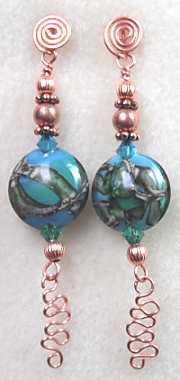 Here’s a quick dangle earrings video tutorial for you, now that you know how to make the quick-change earring posts. After all, what are findings without some earrings to go with them? 🙂
What’s nice about these earrings is that even though the basic design is very, well, basic, you can change it up in all kinds of ways to make something to suit your needs. And it’s really fast — in fact, it normally takes me longer to pick out the beads I want to use, than to make the earrings themselves!
The design is versatile in that you can make them very dainty with a small drop and no dangle, all the way up to over-the-top. Your choice!
Earring Supplies
In order to make these earrings, you will need some supplies. If you’re new to beadwork and wirework, I suggest you make these once first with an inexpensive wire before you try it with sterling silver or gold-filled wire. In the video, I am using copper wire. Here are the supplies you will need.
- 2 eyepins, about 2.5 inches long, in 22 gauge copper wire. You can buy the eyepins or make them yourself.
- 2 lampwork beads (or beads of your choice), about 14mm in diameter.
- 4 Swarovski bicone crystals, 4mm in size. You can use any color that coordinates with your lampwork beads.
- 4 corrugated copper round beads, 4mm in size.
- 2 round copper beads, 5mm in size.
- 4 copper daisy spacers.
- Pliers — a pair of round nose and a pair of chain nose.
- Wire cutters.
- 2 pieces of squiggled wire.
- Earring findings.
As to the squiggled wire, what I’ve done is take two pieces of leftover copper wire that I have bent around my round nose pliers. The design doesn’t really matter — just whatever pleases you. (Making the dangles is fun, and a good way to use up those odd pieces of wire that are too big to throw away, but too small to do much with.)
Quick Dangle Earrings Video Tutorial
Now that you know the supplies, it’s time to make the earrings. The video is only about 7 minutes long, so it won’t take you long to watch it, and then you can enjoy making your own. 🙂
And if you like the video, please feel free to “like” me on Facebook (thank you kindly).
P.S. — you might also want to check my projects page for more jewelry tutorials.
