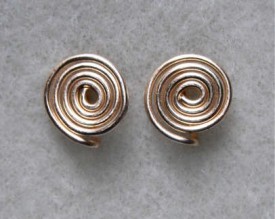
Quick-Change Post Earring Findings Tutorial
This quick-change earring finding tutorial is for people who prefer post-style earrings as opposed to the usual french wire. After all, not everyone can easily wear the french wire style. Not to mention that there are times when a post earring is more practical, like with the heavier earring styles.
At any rate, I see very few video tutorials that show how to make post earring findings. So not only will I do that for you, but I will also show you how to make them in a quick-change style! This will let you quickly (in just a few seconds) change out the earrings you wear.
One of the great things about this style is that if you’re one of the people that needs to wear sterling silver, 14 kt gold (or gold-filled), niobium or other such expensive metals, you can make one pair to quickly change out. And that will save you plenty of money. 🙂
NOTE: After I published this post, I got some messages that something very similar had appeared in the Step-by-Step Wire magazine. Since I don’t read it (although perhaps I should), I didn’t realize someone else had made post-style. Mine are slightly different at least!
Supplies Needed for Quick Change Post Earrings
Here are the supplies that you will need to have on hand to make these earrings. If you plan to use a precious metal for these earrings, I strongly suggest that you make these at least once in a cheaper wire (copper, brass) beforehand. This way you’ll have a better idea of how much wire you will actually need. (No sense in wasting expensive wire.)
Here are the supplies and tools that you will need to make these earrings.
- Wire, 20 gauge. Two pieces, each about 3 inches long. Half-hard is best, but you can use dead soft if needed. Note: You can use 21 gauge wire, but if you do, I recommend that it be full-hard.
- Earnuts, two. I use small rubber earnuts in the tutorial, but you can also use larger rubber or plastic if preferred. You can also try regular metal earnuts, but they may or may not fit 20 gauge wire.
- Round nose pliers
- Needle nose (also called chain nose) pliers
- Flush cutter
- Metal file (for smoothing the ends of the post).
The video is about 12 minutes long, and once you’ve done it a time or two, you will be able to make a pair of these quick-change post earrings in just a few minutes.
Sit back and enjoy! And if you have enjoyed this video, I’d appreciate you “liking” me on Facebook (thanks!).
Right Angle Weave Bracelet Tutorial – Slink Stones
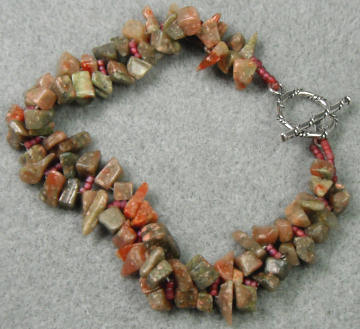
 Here’s a right angle weave bracelet tutorial for the beaded jewelry piece I call “Slink Stones”. It’s made with one of the most unique and difficult to use beads – gemstone chips. Gemstone chips are inexpensive and very textural, but they can be difficult to incorporate into finished jewelry. Here’s a video tutorial for a bracelet done in right angle weave (RAW) that I have titled “Slink Stones”.
(The bracelet style name came about because it has a very slinky feel on the wrist.)
RAW is such a versatile beading stitch, with a variety of looks. It’s most often seen with a square-ish structure (like the right angle weave earring tutorial). However, by using gemstone chips and seed beads, RAW takes on a whole new look.
Supplies Needed
Here are the supplies I used in making the bracelet.
- 16″ strand of gemstone chips; mine are of a gemstone called “autumn jasper”. I used most of the strand, but had some left over.
- Size 11 seed beads, around a gram’s worth.
- Sterling silver toggle clasp.
- Size 10 beading needle.
- PowerPro line, 8lb test.
- Scissors.
A note on the thread; I used PowerPro fishing line for this bracelet since it is rather heavy. PowerPro is strong, but thin enough to go several passes through the size 11 seed beads. It also doesn’t stretch. Fireline or Wildfire can also be used, at 8 lb test. I do not suggest using anything like nymo, as I can just about guarantee your bracelet will break if you do!
So here you go — the video tutorial for making the “Slink Stones” bracelet. It’s about 26 minutes long, so grab yourself something to drink, put up your feet and relax as you watch.
And as always, if you enjoy the tutorial, I’d appreciate if you click the “Like” button on the sidebar. 🙂
Right Angle Weave Earrings With Dagger Beads
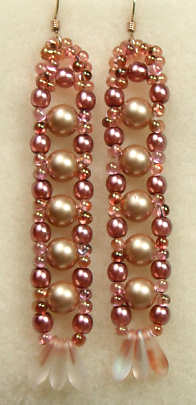
Dagger-style beads are getting to be more and more popular, so here’s a tutorial for making a pair of earrings using right angle weave with these neat beads. And to make things more interesting, I’ve also used some of the new peanut-style seed beads.

I was browsing around at my local bead store the other day and found some interesting seed beads. They are of the “peanut” style, but are called farfalle. I suspect the beads I bought are from the Czech Republic, seeing as they came on hanks and were a little bit variable in size. But they were a luminous pink and bronze, and looked gorgeous so I had to get them.
And of course, the farfalle (i.e. peanut) beads were hanging near to the collection of dagger beads, well, I just had to add some to my basket, even though I wasn’t exactly sure what I was going to do with them. I have learned the hard way — buy now or miss them later (just ask me what happened to my 32 gauge wire I was wanting…)
I had some Czech druk beads sitting at home that were rose-colored, and some Swarovski crystal pearls, so it was off to decide on what I wanted to make.
I decided to make an earring tutorial for this pair, and show you how I did it using right angle weave.
Supplies Needed for Right Angle Weave Earrings With Dagger Beads
The supplies I used for these earrings are as follows:
- Size 10 beading needle
- 1 Pair gold-filled earring wires
- Fireline, crystal, 6 lb test
- 10 Swarovski crystal pearls, 6mm, vintage gold
- 26 Czech druk beads, 4 mm, pearlized rose
- 6 Dagger beads, 9x3mm
- 1 Gram (more or less) of Czech farfalle seed beads, rose bronze, size 11-ish (I said size 12 in the video but I think they are closer to size 11.)
While it’s useful if you already know the right angle weave beading stitch before trying this, it’s not really necessary. As you’ll see, it’s pretty straight-forward.
I hope you enjoy this video tutorial! And as always, feel free to “like” me on Facebook or leave a comment below. 🙂