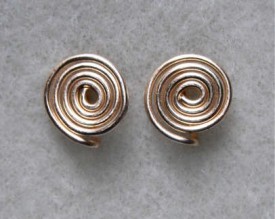
Quick-Change Post Earring Findings Tutorial
This quick-change earring finding tutorial is for people who prefer post-style earrings as opposed to the usual french wire. After all, not everyone can easily wear the french wire style. Not to mention that there are times when a post earring is more practical, like with the heavier earring styles.
At any rate, I see very few video tutorials that show how to make post earring findings. So not only will I do that for you, but I will also show you how to make them in a quick-change style! This will let you quickly (in just a few seconds) change out the earrings you wear.
One of the great things about this style is that if you’re one of the people that needs to wear sterling silver, 14 kt gold (or gold-filled), niobium or other such expensive metals, you can make one pair to quickly change out. And that will save you plenty of money. 🙂
NOTE: After I published this post, I got some messages that something very similar had appeared in the Step-by-Step Wire magazine. Since I don’t read it (although perhaps I should), I didn’t realize someone else had made post-style. Mine are slightly different at least!
Supplies Needed for Quick Change Post Earrings
Here are the supplies that you will need to have on hand to make these earrings. If you plan to use a precious metal for these earrings, I strongly suggest that you make these at least once in a cheaper wire (copper, brass) beforehand. This way you’ll have a better idea of how much wire you will actually need. (No sense in wasting expensive wire.)
Here are the supplies and tools that you will need to make these earrings.
- Wire, 20 gauge. Two pieces, each about 3 inches long. Half-hard is best, but you can use dead soft if needed. Note: You can use 21 gauge wire, but if you do, I recommend that it be full-hard.
- Earnuts, two. I use small rubber earnuts in the tutorial, but you can also use larger rubber or plastic if preferred. You can also try regular metal earnuts, but they may or may not fit 20 gauge wire.
- Round nose pliers
- Needle nose (also called chain nose) pliers
- Flush cutter
- Metal file (for smoothing the ends of the post).
The video is about 12 minutes long, and once you’ve done it a time or two, you will be able to make a pair of these quick-change post earrings in just a few minutes.
Sit back and enjoy! And if you have enjoyed this video, I’d appreciate you “liking” me on Facebook (thanks!).
Leave a Reply