Right Angle Weave Earrings With Dagger Beads
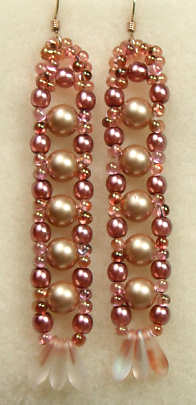
Dagger-style beads are getting to be more and more popular, so here’s a tutorial for making a pair of earrings using right angle weave with these neat beads. And to make things more interesting, I’ve also used some of the new peanut-style seed beads.

I was browsing around at my local bead store the other day and found some interesting seed beads. They are of the “peanut” style, but are called farfalle. I suspect the beads I bought are from the Czech Republic, seeing as they came on hanks and were a little bit variable in size. But they were a luminous pink and bronze, and looked gorgeous so I had to get them.
And of course, the farfalle (i.e. peanut) beads were hanging near to the collection of dagger beads, well, I just had to add some to my basket, even though I wasn’t exactly sure what I was going to do with them. I have learned the hard way — buy now or miss them later (just ask me what happened to my 32 gauge wire I was wanting…)
I had some Czech druk beads sitting at home that were rose-colored, and some Swarovski crystal pearls, so it was off to decide on what I wanted to make.
I decided to make an earring tutorial for this pair, and show you how I did it using right angle weave.
Supplies Needed for Right Angle Weave Earrings With Dagger Beads
The supplies I used for these earrings are as follows:
- Size 10 beading needle
- 1 Pair gold-filled earring wires
- Fireline, crystal, 6 lb test
- 10 Swarovski crystal pearls, 6mm, vintage gold
- 26 Czech druk beads, 4 mm, pearlized rose
- 6 Dagger beads, 9x3mm
- 1 Gram (more or less) of Czech farfalle seed beads, rose bronze, size 11-ish (I said size 12 in the video but I think they are closer to size 11.)
While it’s useful if you already know the right angle weave beading stitch before trying this, it’s not really necessary. As you’ll see, it’s pretty straight-forward.
I hope you enjoy this video tutorial! And as always, feel free to “like” me on Facebook or leave a comment below. 🙂
Right Angle Weave Tutorial
The right angle weave beading stitch is something that many people have problems with. The path of the needle and thread through the beads isn’t exactly intuitive. I started creating an ebook tutorial, then I decided that it would be easier to just make a right angle weave video tutorial so you could watch me!
Advantages of Right Angle Weave
The biggest advantage in my opinion is that it is the perfect beading stitch for embellishments. The right angle weave (also called RAW) creates a netting effect, and the spaces between the net make a wonderful place to put pearls, crystals, and all manner of neat goodies!
RAW is also a very flexible stitch, and the drape of the resulting “fabric” is luxurious. You can make it as dense as you wish (each cell containing 4 size 15 seed beads) to very open (multiple beads in a cell and/or larger bead sizes).
Speaking of bead sizes, RAW is excellent for making a quick set of earrings. If you use 6mm beads for each unit, you can also whip up a bracelet or even a necklace in next to no time.
Many people do the right angle weave beading stitch using seed beads, but I like to explore new options by using different kinds of beads. After all, that’s what beading is about — making one-of-a-kind projects!
Video Tutorials
On this page are two videos that show you how to do right angle weave. You’ll probably want to watch them all the way through once before you grab your needle and thread.
I also have a video for making a pair of earrings — click here for that video.
Meanwhile, here you go — two videos. I hope you enjoy them, and if you enjoyed them, please feel free to “like” me on Facebook and/or leave a comment below. 🙂
Freeform Wirework Beaded Pendant Tutorial
 Do you love the look of freeform wirework? It’s what first drew me to making jewelry, and every so often I feel the need to get back to my roots. This time, though, I also want to teach you while I’m at it!
Now freeform is what it implies — putting beads and wire wherever suits your look. However, if you’re used to a more structured type of jewelry, freeform wirework can be a little intimidating. Not to worry; I have loads of pictures with ideas of where you can place your wire and beads. I’ll also talk about the kinds of beads and wire used for the projects.
Tools? It’s pretty simple — a wire cutter, a pair of round nose pliers and a pair of chain nose pliers. No fancy tools needed to get the fancy look!
What You Will Learn
So what will you be learning in this tutorial? How about:
- Creating a wire backbone for the pendant; I show you two different ways, so you can pick the one you like best.
- How to make neat wire wraps.
- Choosing materials.
- How to work freeform, even if you’ve always used a pattern!
And so much more!
Dress it Up
 The neat thing about this pendant is that once you learn the basics, you can make it as simple or fancy as you choose. You can also make them in many sizes — that’s the joy of freeform wirework.
Not only do the colors of beads make a difference, but also the textures. Mixing matte with shiny, round with irregular, organic and synthetic — it’s all fair game!
When you get right down to it, freeform is about taking supplies you might not ordinarily put togther and making something wondrous with it.
Photos, Photos, Photos!
I’ve got lots of photos for you in the ebook tutorial. In the 25 pages, you’ll find 43 full-color photos. There are a lot of close-ups, so you’ll be able to follow the steps easily, without squinting.
There are two projects in this freeform wirework beaded pendant tutorial; they are the pendants on this page.
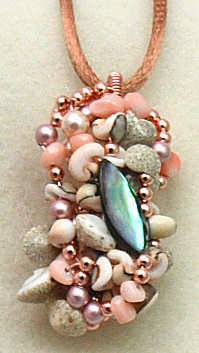
“Under the Sea” features pearls, shells and coral, for a subtle and elegant look. It’s really timeless and goes with just about anything.
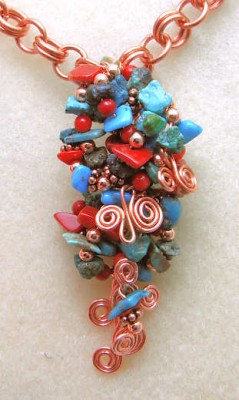
“Desert Spirit” is more Southwestern in flavor, featuring lots of turquoise and copper. It also has more movement, thanks to the dangles on the bottom, and the spirals in the body of the pendant.
Here’s a quick overview of the pendants covered in the tutorial.
How to Buy the Tutorial
Your tutorial is delivered as an ebook, so it’s an immediate download. This means you can satisfy your “need to bead†at any time of day or night!
(Keep in mind that while you’re not getting a paperback copy in the mail, it also means that you don’t have to wait for the mailman — yay!) Also, because of the nature of this tutorial, there are no refunds. But I’ve tried my best to over-deliver for you!
The freeform wirework pendant tutorial is just $5, and you’ll get instructions for making both the Under the Sea and Desert Spirit pendants. You’ll get all kinds of compliments, and you’ll be able to proudly say, “Yes, I made this myself!â€
And guess what else? You can use these designs in jewelry that you sell! Yep, you can use the directions to make jewelry and then offer it for sale. (All I ask is that you credit me with the original design — fair enough?)
So click the “Add to Cart†button above and you’re on your way to making your very own freeform wirework beaded pendants. It’s secure and you can safely pay with any major credit card. You’ll receive the download link in an email lickety-split after you place your order.
Thanks so much and I hope you enjoy making this piece of wire and beaded jewelry!

